We don't have a fireplace in our house, so we like to pretend by lighting several candles and watching the flames flicker. Or we watch this video of a fireplace, but it just isn't quite the same as the live flame.
If you are making a lot of candles, it takes most of the day, so leave plenty of time for cooling.
Here are some more images from my day of candle-making.
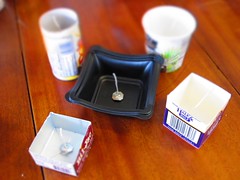
 First you start with your supplies: molds, wick with wire in it (I found this type to be easiest to work with), metal wick anchors, a stirring stick, an old pot for cooking down the wax, pliers for handling hot cans, old tin cans for melting wax in, and newspaper.
I like to recycle old candles to add color and scent to my new candles.
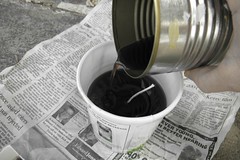
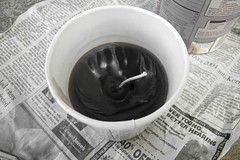
Cook down the first batch of wax with similar colors by putting the wax in a cleaned out tin can (paper removed) and "double boiling" it, with water around the can in the pot. You don't have to dig out the old wick or anything else that might be in the candle- it will sink to the bottom and you can pour the clean wax off the top.

Cut your wick to the right length and squish it with pliers in the metal anchors and tighten them down.
If you do spill on fabric, here is a tip: put newspaper over the fabric and use a hot iron on it- the wax will melt and most of it will be pulled up into the newspaper.
 Next is the hard part- waiting and watching. Don't let the wax cool too quickly or it will deform the wick to one side, or worse yet, crack the wax. It is likely to form an indentation no matter how slow it cools, so save a bit of the wax from the original batch to fill it in once it is cooled down. You will likely have to remelt it, so keep it in the same can you cooked it in the first time.
Once the candle is completely cool (I usually wait overnight) peel the paper off the outside to reveal the candle inside. This is the best part!
 I usually wait to make candles until I have a bunch of old candles sitting around, and I collect molds in the meantime.
You can get fancy-
- I've done layers with colors (waiting to pour the wax in until after the previous layer is completely cooled),
- Put ice cubes in the mold, pour in one color, wait until it is cooled and the ice turns to water, dump out the water, then add a second color
- Add cinnamon sticks or other whole spices to bring out a scent and add some texture
- Add dried flowers or leaves or paper to the outside once you've pulled off the paper. Attach them by using a paint brush to apply some melted wax, place the decoration on, then paint over it with wax several more times.
- Use funky molds to add shape variety. I reuse milk, juice, or ice cream containers, and sometimes even plastic sandwich containers from the deli. Just make sure to clean them out very well before you store them, or you'll get a nasty surprise when you go to craft your candles in the future.